Archive by Author

Happy Halloween

31 Oct

Sorry for the lack of posts. It’s been to crazy around here. Midterms :..(

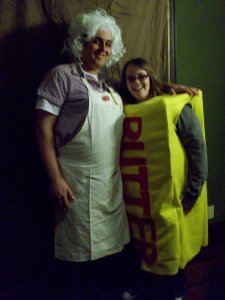
But to make up for it, our Halloween costumes:

Paula Deen and a stick of butter.

P.S. I made mine, it was super easy and made out of felt. Oh and this was the hubs idea, not mine. But no doubt about it, awesome.

New Bag

17 Sep

So over labor day weekend, I had to have some sort of project. Working on homework all weekend just wasn’t going to fly. So I searched high and low in an effort to find a pattern for a new bag. I looked through tons of free patterns and I just couldn’t find anything. So I started googling purse patterns, and I still couldn’t find anything. So off I went to Joann’s. I searched though pattern book after pattern book and finally settled on one:

http://voguepatterns.mccall.com/v8609-products-10485.php?page_id=181

The one I made was the one on the bottom left. I am  really happy with the way it turned out. The pattern was pretty easy to use too. I get easily overwhelmed if I look to far ahead so I just followed it one step at a time and it turned out great.

The orange flower material is out of a decorator’s sample book. There was a thrift store we went to when we visited Dan’s grandparents this summer that had stacks ans stacks of them, so I grabbed it for only $1. It’s really heavy home decor weight fabric. I think it is going to hold up well. So far it seems to be and it’s been several weeks.

That orange fabric is on both sides. I was really nervous about the pleats but I love how they turned out. It was really hard for me to get my head around doing the pleats, but once I figured it out, I think they really add something to it. Right now at Joann’s I saw that they have costume material out and one of them is these brightly solid colored pleather like material. I’m sure it’s suppose to be for Halloween costumes but I think it will make an awesome bag, so I might go get some soon. They are really thin, so I think Sally the sewing machine won’t complain too bad. I really enjoyed making it. And it was cheaper than other bag that I saw and actually liked, so worth it to me.

Elephant Map Art Tutorial Phase 2

7 Sep

Ok, yesterday we tackled the map portion. So this is what you should have:

Next we need to make the elephant silhouettes.

What you need to do is go online and find a silhouette of something you want. I can me any animal, thing, person, whatever. Just find a picture and print it out the size you want your silhouette to be.

Once you print it out, cut it out.

After it is cut out, trace it on whatever you want your silhouette to be on. I just used some simple card stock. You could use a cardboard or a thin wood if you wanted to use the jigsaw to cut it out. The dimension either of those would give you would be pretty cool. I went the easy route and just did card stock though. Whatever you use, make sure you can paint on it though, so I wouldn’t suggest using plain old typing paper.

Once you have your silhouette traced, cut out the silhouette again. Be careful this time though because this is the final product.

Once you get both of your elephants or all of your silhouettes cut out, paint them with some brown or black paint. I chose brown since my map was so brown. I liked the brush strokes in mine, so I didn’t try to make them perfect. I figured it went well with the distressed, aged look of the map. At this point, they might want to curl up a bit since it’s just card stock. Find your nearest graduate student and borrow all their books for the semester and leave your elephant silhouettes to press for a couple of hours or over night like I did. Caution, make sure your paint is dry. If you get paint on their books, they will come after you. Trust me, these are my text books for this semester and if someone got paint on them, I would go nuts. But I like books too…..

After your silhouettes are dried and pressed just use some double stick tape to put them on your map. And you are done with your changeable piece of art!!!

I hope you are as happy with yours as I am with mine!! Now go hang it up. I’ll show you a grand reveal of my bedroom soon!

Elephant Map Art Tutorial

6 Sep

Ok, here is the tutorial I promised. I am super excited about this. It was really easy to make and I love how it turned out. Plus I made it to where the elephants are just stuck on with some double sided tape because I thought the map turned out so great.

What you need for the map part:

(Please ignore that paint pen)

Canvas in whatever size you want. Mine is 15 in by 30 in

Map of some sort. I got mine off Amazon for pretty cheap. You could look at bookstores or maybe if your kids school is getting rid of those old roller ones, that would make for an awesome giant one. *note if you ever find one of those, I will pay for you to ship it to me

Mod Podge

A paint/sponge brush

Distress Ink

possibly a ruler or smoothing tool thingy

Step 1: If you want a smooth finish, use the brush to apply the Mod Podge to a small portion of your canvas. If you want a crinkly finish with giant bubbles and creases, apply the Mod Podge to the entire canvas.

Step 2: Stick your map down to the portion that is Mod Podged. If you are doing the smooth version, smooth all the bubbles out and continue repeating step 1 and 2 until your entire map is stuck to the canvas. If you are doing the rough, I want this to look all old and authentic version (or the I don’t have time and patients to deal with doing this slow and steady route) then just stick the map down to the entire canvas and smooth out until you like the ridges and bubbles.

Step 3: Now that you have the map like you want it, you have to do something with all that hang over. You have two options. You can just cut around the canvas and paint the edges or you can wrap the map around the canvas. I chose the wrapping part. To do that part what you do next is cut a diagonal line from each corner to the edge of your map.

After you have the lines cut, use the brush to paint Mod Podge onto the canvas on the side you want to wrap first. Make sure you get the edges as well as the back so the map with stick really well when it is wrapped.

Next you are going to want to cut off that little triangle of map that overlaps the canvas on the side like this:

Then do the same thing to the opposite side. After you have the top and bottom done (or the left and right side depending on where you started) do the left and right side (or top and bottom). So you should have a map that is wrapped around your canvas.

Step 4: After you have the map the way you want it, I took the distress ink and aged the creases and bubbles. My map had a shiny surface so I would put the ink on and then rub the ink the opposite direction. So I would swipe the ink from the left to the right and rub the ink in up and down. I was really happy with the way it turned out:

I originally was going to paint my elephants right on to the map, but I liked it so much that I decided to make it where you could take the elephants off. This way I can change the silhouette when my decor changes. Tomorrow I’ll post the next phase of making the elephants!!

Fall Wreath

4 Sep

It’s beginning to feel a lot like fall around here! And I can’t be more excited about that. So of course that required a new decoration for our front door. Since we live on a Seminary campus, I am leery about putting up Halloween decor. I don’t want to make anyone mad with my door decs and people get really upset about things like Halloween. So I went for a nice fall color theme:

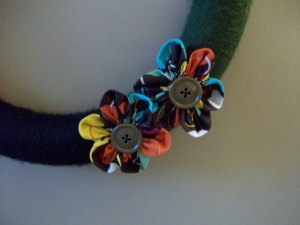
I just used yarn from my enormous yarn basket and wrapped it around a Styrofoam wreath form. After the yarn was done, which took forever by the way, I whipped up a couple of fabric flowers. To attach the flowers I just used stick pins and stuck them into the Styrofoam. The skinny brown ribbon I hung it with also came from my stash as well as the buttons that are the center of the flowers. I love it. It makes me happy to come home everyday to it. Here is a close up of the wreath:

And just cause, here is a close up of the flowers:

Elephant Map Art

2 Sep

Since I got a new duvet cover, that means I had to redo the whole bedroom right? That’s what I though. Well, we have a big wall that is empty. It has been since we moved in. Two years ago. Our bedroom looks like it is half done for two years now. I finally got tiered enough to change it. My younger sister Amber when to South East Asia this summer and her task for going, according to me, was to find something to put on said wall. Really she went to visit a friend of ours and do some good work there, but my main purpose for going, was to fill this wall with something awesome. She brought me back these awesome pillow cases that are silk and have a band on them that has elephants. Elephants are huge in Asia, like they are on everything, and they are massive creatures. With the new duvet cover these pillow cases work great. So instead of hanging them on the wall, I put pillows in them. Novel idea, I know. So my wall problem still remained. By solution: elephant map wall art!

I really like it. I think it turned out well. I’ll have a tutorial up in the next few days so you can see how it’s made!

Ooo, and have a great long weekend! Perk of working and going to school where I am: extra long weekend!! Yippy for a real day off on Monday!

I can’t wait for fall!!

31 Aug

So I can’t wait for fall to get here and the temperatures to go down a bit. The air conditioning quit in my car and it’s just not worth fixing at the moment. So fall is a welcome change for me this year. Also, I just love the colors of the trees and the brisk bite to the air. And mostly I get to wear my scarfs again. I love scarfs. It all started last year when my mom bought me one of those linen like ones that are really thick and long. Since then I have become obsessed. Check out my new one from what might just have become my most favorite store ever:

I love it. It is from a new store that is very boutique like. So I thought it would be really expensive but it’s not. That scarf was on sale for $4.99!!! It was only $10 regularly! It is so soft and fancy. I love it. I feel like a real grown up when I wear it, that is around my house, because it is 90 degrees outside, but I have to wear it right? It’s new.

Em’s 4 Simple Goals

29 Aug

Well a couple of weeks ago you got introduced to Meg’s 4 simple goals from Elsie over at A Beautiful Mess.

Well here are my simple goals:

  1. Encourage and empower creativity. This blog helps me to stay creative. I do things to post on this blog. Reading others blogs also keeps me creative. So when the semester is really being awful to me, I can still create. I want to help other people be creative. I want to give others the tools and encouragement they need to be creative in their daily life.
  2. Start a new weekly feature here on the blog. In an attempt to blog more regularly and be consistent, I want to start a weekly feature. It will just be a simple glimpse of my life each week. Something I like, something that has happened, a quote I liked, a subject I’ve been thinking about. Just something about me and my life.
  3. Eat more healthy. Eat vegetables. Eat organic maybe? well, more things organic. Just eat better. More fruit less ice cream.
  4. Don’t procrastinate on school. Don’t leave projects till a week before they were due, esp when they were suppose to take you a month to do it. Do things before they are due so I don’t freak out about them.
  5. Communicate with those around me, primary with the hubs.

Yes, that is five, but that last one was really important. It should be number one 🙂 I hope you take the challenge too. You can post it on your blog and leave a link in the comments or if you don’t have a blog I would love for you to do a guest post here. I just want to empower and encourage you to do what you always wanted to do. It doesn’t matter what that thing is, just go and do it. Quit making excuses and try. The worst that can happen is that it doesn’t work out. Then you can just move on to something else. One of my professors this week discussed how we are not afraid of failing, we are afraid of succeeding. So stop being afraid and try. You might just succeed more than you ever imagined possible.

Birthday Chocolate

25 Aug

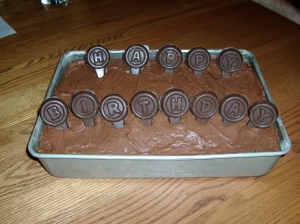
When you walk to the checkout at Joann’s the isles are lined with what I call impulse buys. Well I am a horrible impulse buyer. I mean horrible, I would buy it and then get home and realize I had three of them and never used any of them. But they sure looked handy and they were only $3. Well, I only $3 myself to death. Well, as Joann’s the other day, the line was really long, so I was looking at all the impulse buys. Well, Wilton had these little cupcake chocolate pick molds that spelled out Happy Birthday. And they were only $2. Well, I’m super glad I got them. I made them for my mom for her birthday. I even made them into crunch bars with rice crispy in them because those are her favorite.

Sorry about the flashy picture. I left my camera at home and I used mom. I’m not use to hers. They turned out really well. I piped the letter and circle in the mold and let that harden. Then I filled in the back and pick part with the crunch mixture. They were super easy but really add some to the cake. It would be super cute to do them with white chocolate that was colored.

New Hair Cut!!

23 Aug

So along with everything else, my mom also cuts hair. We went home this weekend and I got a new hair cut!

I really like it. It was down to the middle of my back. We cut it so I can send it to Locks of Love. Mom did a great job!!